
Timeline history UI
Timeline History view
The timeline history view can be found by selecting “details” for any VDB located on the VDB list page in DCT and selecting the “Timeline History” tab. This view serves as a developer-centric console that shows the complete history of a VDB including non-active timelines, which is a critical resource for developers as these can contain information like past test results. Using this page, developers can curate and access the complete chronology of their testing efforts with operations such as renaming individual timeflows, make active, refresh to snapshot, and create bookmark to drive organization and access.
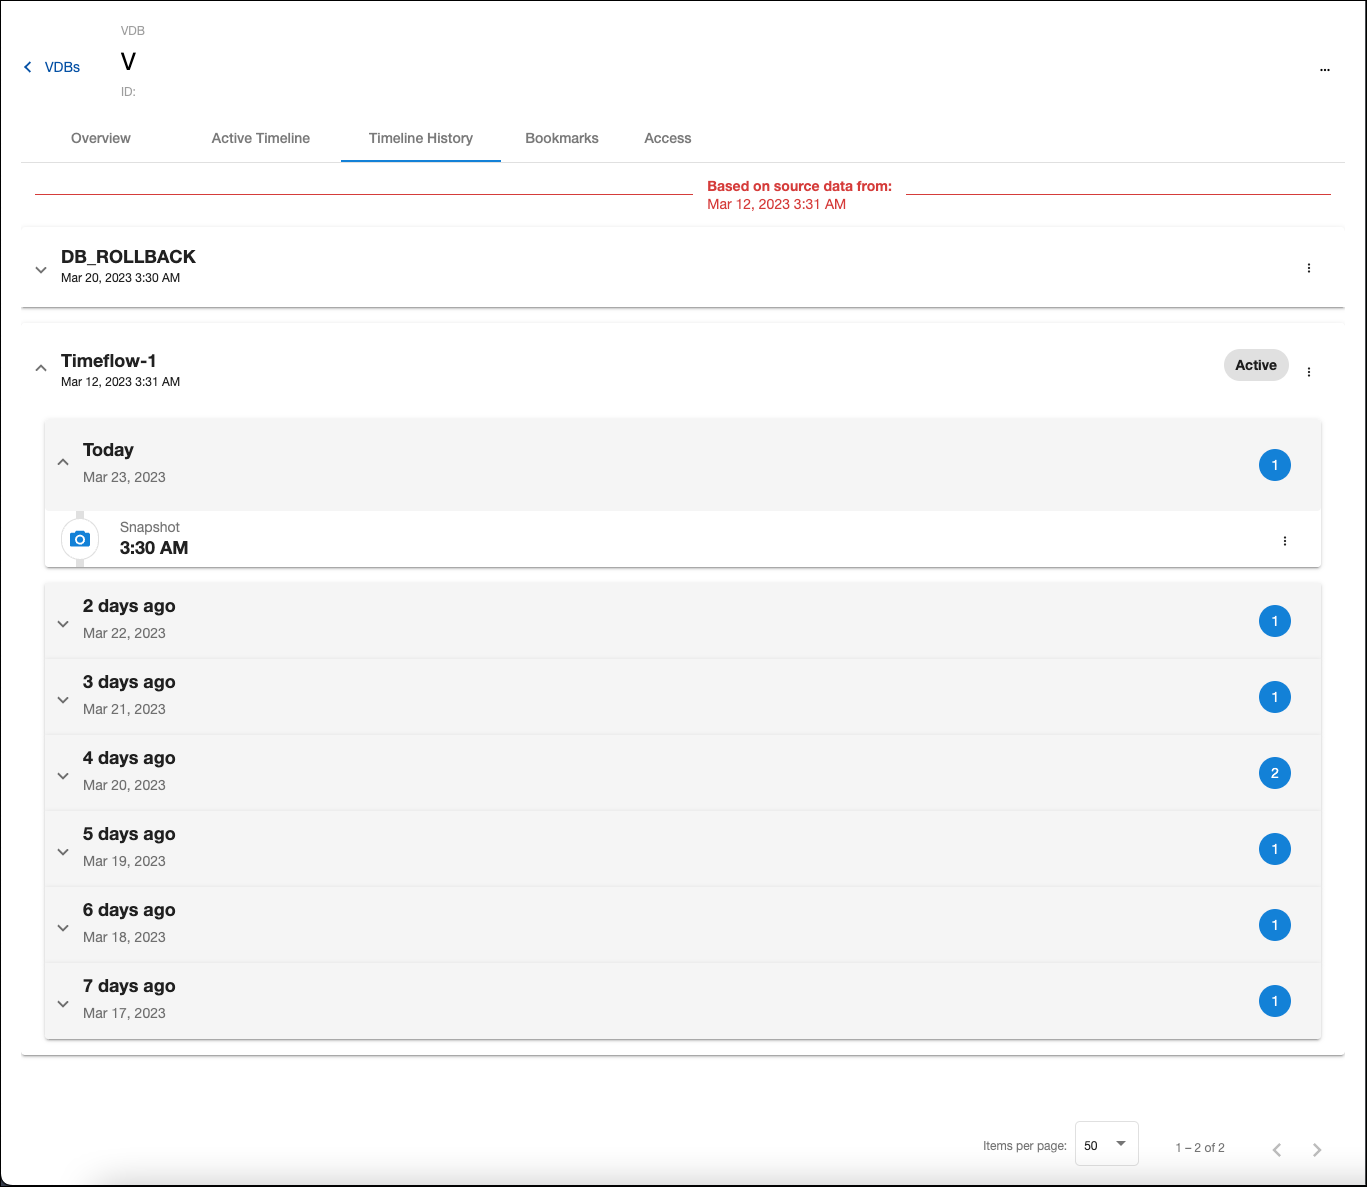
The Timeline History user interface
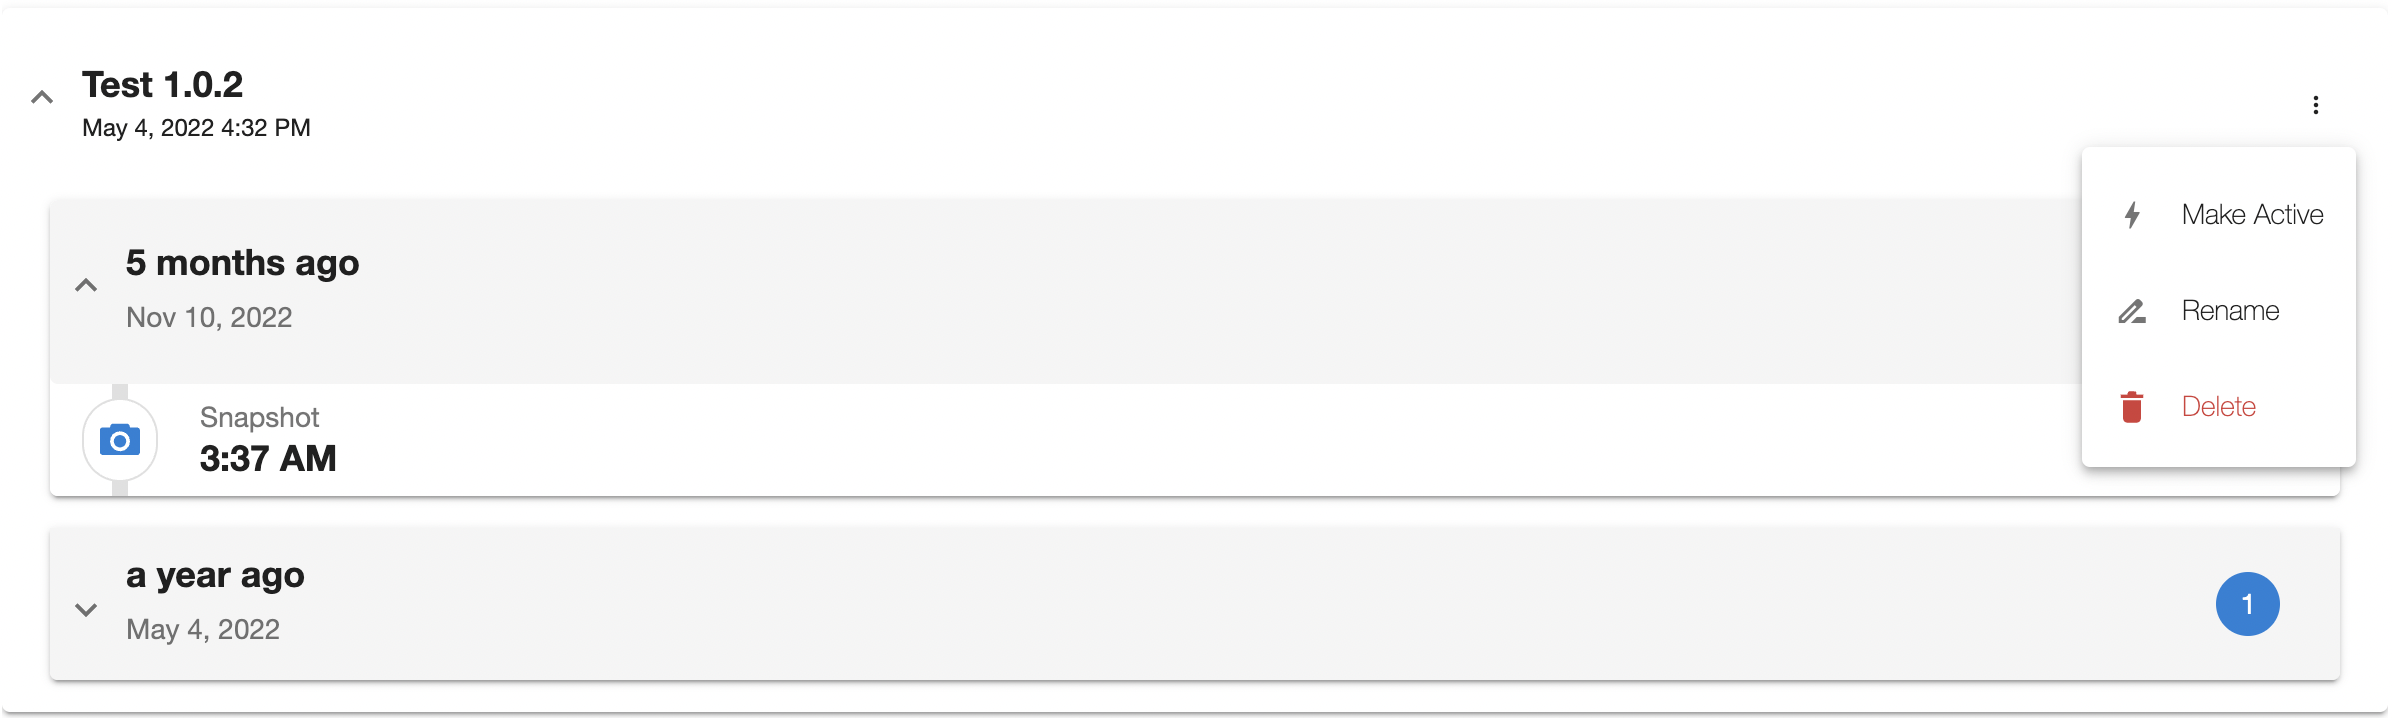
If entitled via the DCT Access Control system, developers can see and act upon VDBs in the VDB list view using the timeline history tab under "details". The timeline history UI is comprised of a vertical timeline-based representation of all actionable points of interest (snapshots) for that VDB. The snapshot list is chronologically grouped over blocks of time to easily identify relevant snapshots to act upon. Once the right snapshot is found, users can access a contextualized action menu by selecting the corresponding ellipsis to the relevant snapshot.
Non-active timelines
Non-active timelines (often referred to as “timeflows” in Self-Service) are a critical aspect of how Delphix Virtualization works and an important Developer Tool. Whenever a time-based operation takes place, the previous timeline (and associated data) becomes non-active and a fresh timeline takes its place.

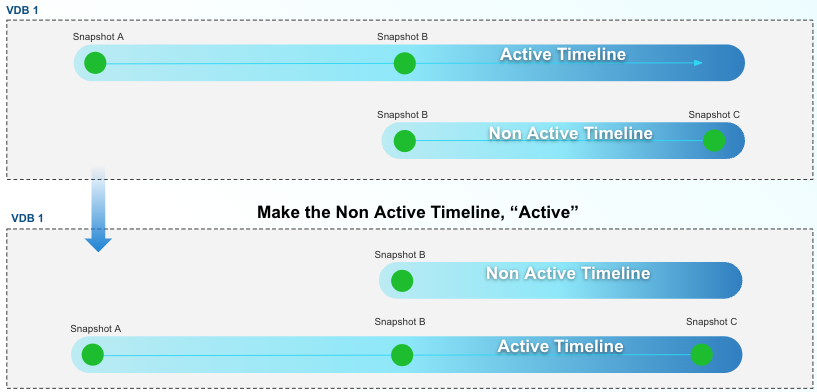
Non-active timeline creation from "Self-Refresh"
In this scenario, a developer has performed a “self-refresh” (formerly referred to as a “rewind” or “rollback”). In refreshing Snapshot B, the developer has created a new active timeline that represents a clean slate starting with the data state of Snapshot B. If the developer wants to refer back to the past results that are represented on the non-active Timeline, he or she can activate the past timeline by hitting the “Make Active” button in the DCT User Interface or by refreshing to a point in time by referencing the non-active Timeline’s ID.
For developers, having the ability to catalog (name and tag) and reference past timelines is a critical aspect of application development such as performing ad hoc code validation or manual testing. The timeline history UI in DCT provides a home for single VDB visibility of all accessible timelines (note: timeline availability is controlled through capacity management and snapshot retention policies).
Time concepts within the Timeline History Tab
DCT’s new user interface highlights different notions of time within Delphix (e.g. dSource, VDB, and VDB lineages) and how they relate to one another. These time-based relationships are exposed in the Timeline History view to drive accurate testing for developers.
The “Based on dSource time” designation helps to drive awareness of the relationship between a VDB and its dSource provision point (in most cases this will equate to the production database’s state at that time), which is helpful for use cases such as capturing data from a meaningful event. As a VDB refreshes to newer snapshots on a dSource, those changes of data state are grouped separately on the Timeline History view as they represent completely different data.
Timeflow operations
“Make Active”, a developer can reference any past timeflows and data represented therein by making a timeflow “Active”. This can be done by simply clicking on the timeflow of interest and selecting “Make Active”.
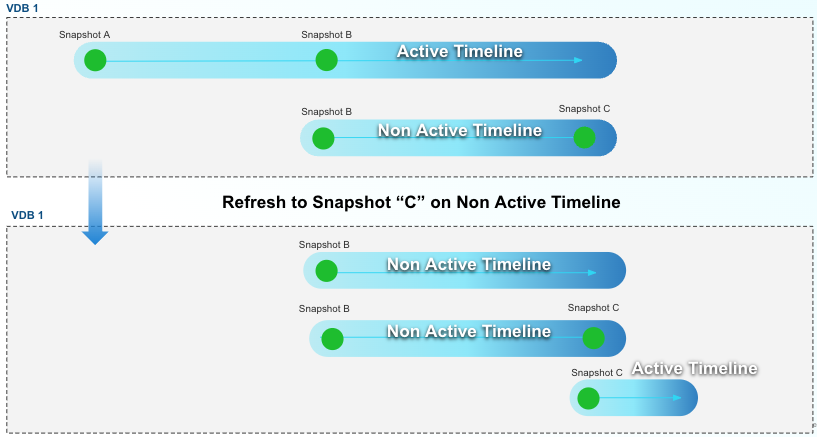
Refresh to snapshot
Included within each timeflow are snapshots that can be accessed via a dropdown menu under each timeflow. If given the right permission, a developer can refresh the VDB to that snapshot. While this may seem similar to “Make Active”, there are major underlying differences as a “Refresh” will reprovision the VDB based on that point in time, whereas, “Make Active” simply changes the reference to different blocks of the underlying storage.
Create bookmark
On a snapshot will enable developers to convert that snapshot into a DCT Bookmark that enables developers to assign a name and special retention policy to that time reference. This also enables stronger collaboration between developers as bookmark references can be used for a sibling refresh operation.
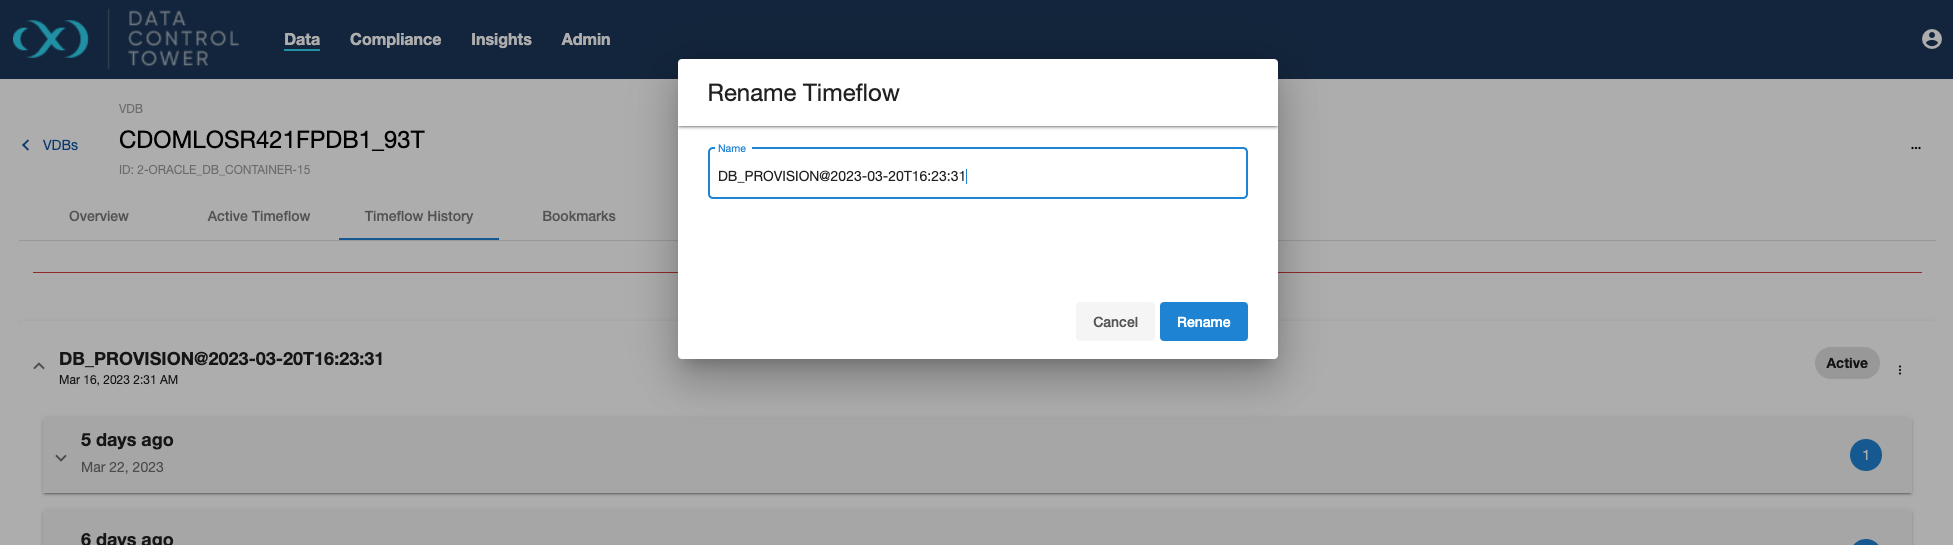
Rename timeflow
Developers can curate time flows to correspond to tests such that they can easily reference results data. This action can be performed by clicking the ellipsis on the time flow to reach a drop-down menu. This menu includes the option to "rename" which will open a dialog box to input a new name. The input is prefilled with the current Timeflow name by default. Saving the dialog kicks off a job to rename the timeflow. The changes may take a short time to be reflected in the UI.
Delete timeflow
Developers have the option to delete time flows via the UI by selecting the ellipsis next to the corresponding time flow and selecting "delete". When clicked, this opens a confirmation dialog asking if the user wishes to delete the timeflow. If the dialog is confirmed, a job is kicked off to delete the timeflow. Note: This menu item is disabled for the currently-active timeflow.
API documentation
While the DCT UI provides a visual aspect to timeflow chronology and grouping, the DCT API has all of the necessary instrumentation to integrate these concepts into automation. The formal documentation can be found via DCT's swagger docs or the developer resources documentation section. This portion of the timeflow documentation will provide some general examples:
Get a list of a VDB's timeflows
This simple call will enable the listing of the entire timeflow roster underneath a VDB enabling a developer to take inventory and action.
curl -X 'POST' \
  'https://<APPLIANCE_ADDRESS>/v3/timeflows/search?limit=50&sort=id' \
  -H 'accept: application/json' \
  -H 'Authorization: <API_KEY>' \
  -H 'Content-Type: application/json' \
  -d '{
  "filter_expression": "dataset_id eq '\''1-ORACLE_DB_CONTAINER-2'\''"
}'
The UPDATE timeflow API can be used to change a timeflow's name
Once the appropriate timeflow is found, developers can rename the timeflow to align with a naming scheme or other relevant designations such as a compatible code branch.
curl -X 'PATCH' \
  'https://<APPLIANCE_ADDRESS>/v3/timeflows/1-ORACLE_TIMEFLOW-7' \
  -H 'accept: application/json' \
  -H 'Authorization: <API_KEY>' \
  -H 'Content-Type: application/json' \
  -d '{
  "name": "Latest on refresh state"
}'
List all the snapshots for a timeflow
Developers can then use the snapshot API to find all relevant "actionable" points in time on the identified timeflow. The below example shows how to only expose snapshots on a particular timeflow. From there, developers can feed the relevant snapshot ID into refresh or provision endpoints or create a bookmark reference from that snapshot.
curl -X 'POST' \
  'https://<APPLIANCE_ADDRESS>/v3/snapshots/search?limit=50&sort=id' \
  -H 'accept: application/json' \
  -H 'Authorization: <API_KEY>' \
  -H 'Content-Type: application/json' \
  -d '{
  "filter_expression": "timeflow_id eq '\''1-ORACLE_TIMEFLOW-7'\''"
}'