
Objects: Refine permission to targeted objects
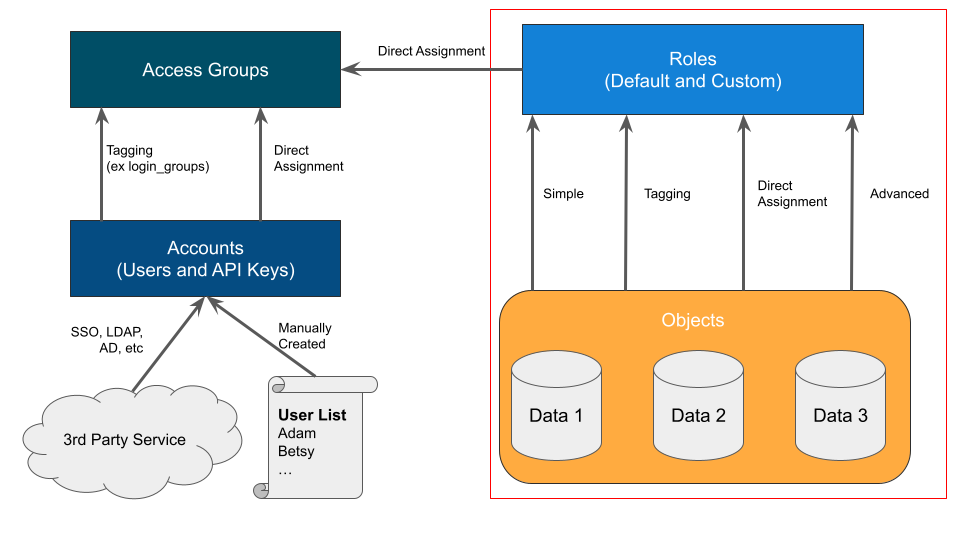
Every Access Group’s Role has its own set of Objects to which the permissions are applied. In the previous section, we defined the permissions, and now we select the Objects. Objects are assigned in three different modes. They are listed below with their method of application:
Simple - All Objects within DCT.
Scoped
Tags - Objects with matching Tags.
Direct - Objects manually assigned.
Advanced Scoped - Objects are assigned directly on the permission action (such as Read Bookmark, Edit Bookmark, or Delete Bookmark) using Tags or Direct Assignment.
We will work through the first two in this post, Simple and Scoped. Advanced is easier to comprehend afterward and a solid self-lead challenge. Before diving into this section, we recommend that your DCT server has a handful of objects, such as Bookmarks or VDBs.
Simple
If you have been following the post steadily, you should have two Roles assigned to your Access Group. In my example I have “devops” and “Limited Monitoring”. Both are given the “Simple” mode by default. We can see the breadth at which this Role governs by selecting anywhere on its row and then the “Preview” button on the right-hand side.
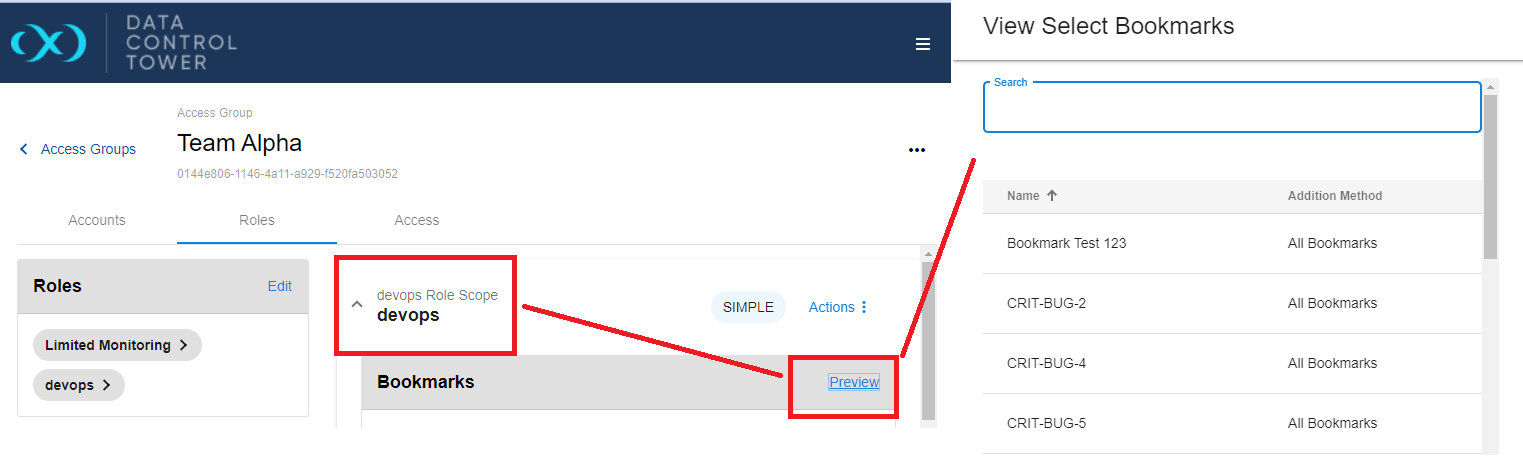
In this example, we select the “Preview” list for Bookmarks. It displays every Bookmark this role has access to and the method to which they are applied. If we wanted to validate, we could log in as a user on this Access Group and verify the permissions are applied. However, this is an easier way for Administrators to confirm without switching logins. Because this is a “Simple” scope, every object is available, so this view is not particularly intriguing. In the next part, we’ll refine our Role.
If you do not see any objects listed in the “Preview” widget, that object might not be available to DCT. This could be because (a) engines are not connected, (b) the DCT-only object (such as Bookmarks or VDB Groups) is not created, or (c) permissions are being enforced correctly.
Scoped - Direct
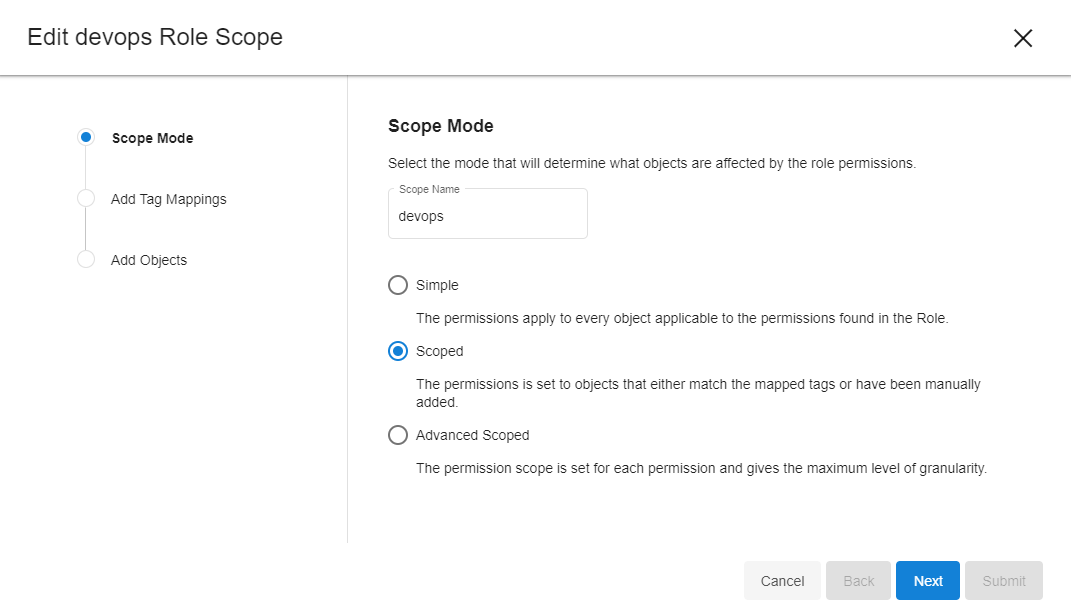
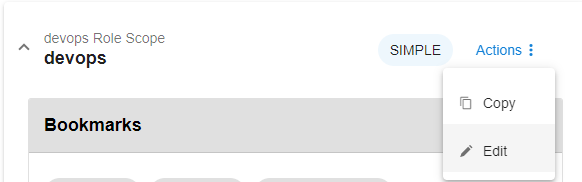
Let’s change the mode to “Scoped” and target a subset of VDBs. On the Access Group > Roles tab, select the Action > Edit button of your chosen Role.
A new wizard will appear with the Simple, Scoped, and Advanced Scoped options. Change the Role’s mode from “Simple” to “Scoped”. Skip the “Add Tag Mappings” for now and select “Next” to move to “Add Objects”. You will be presented with a long list of the objects available to DCT. This is where you can manually assign specific DCT objects.
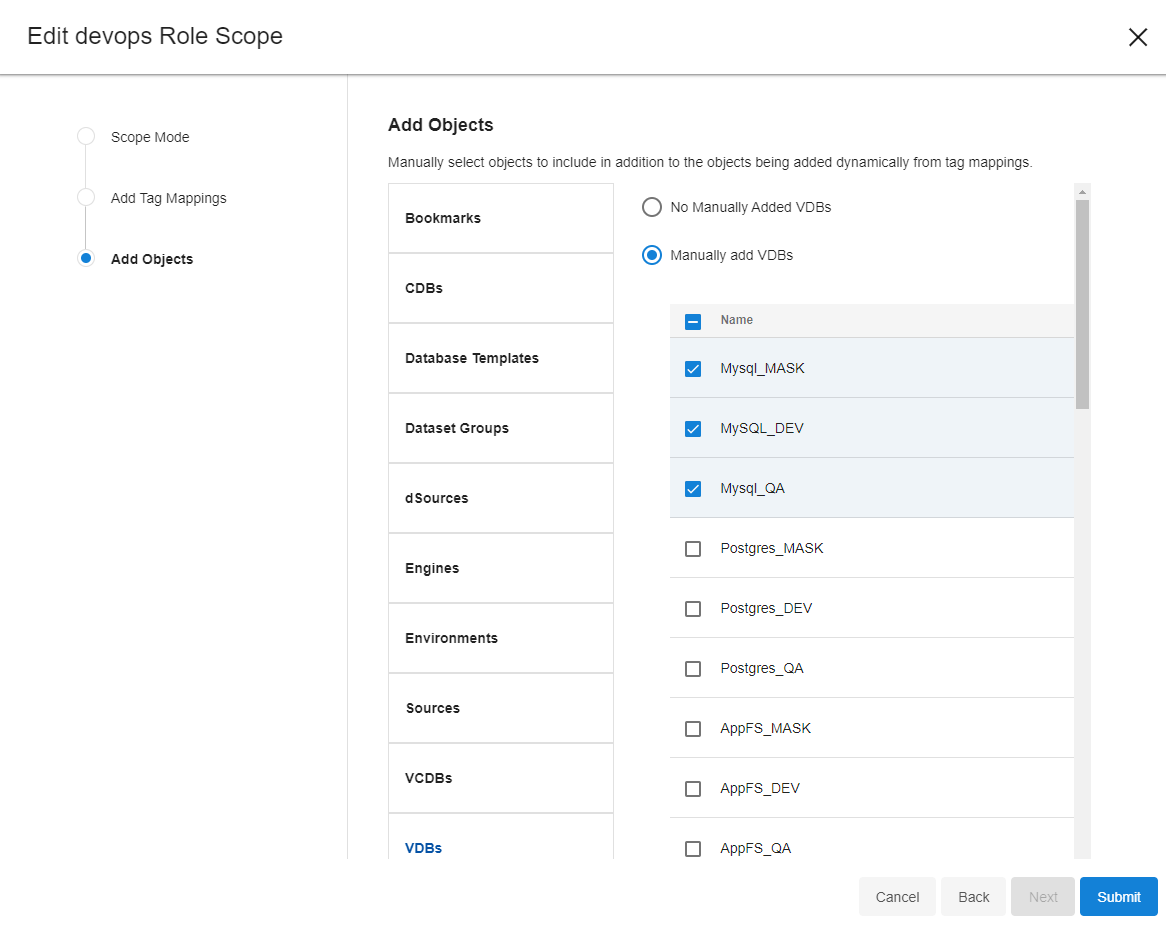
Scroll down the Object type list and select VDBs. Next, choose the “Manually add VDBs” radio button and, on the right-hand list, select a couple of VDBs. Feel free to add other available Objects too. When happy with your selection, press the “Submit” button. This set of actions should change the Role’s “Simple” mode to “Scoped” mode. Let’s verify by, again, opening the Role’s row, scrolling to your chosen Object Type, and selecting the VDBs’ “Preview” button.

In my example, the same three VDBs I selected during permission configuration are shown here. If you want to verify manually, log in as your other test user and confirm.
Any other Roles or Access Groups assigned to this user might affect its visibility. So if you do this test, ensure it's not accidentally pulling in another permission set.
Scoped - Tags
Direct Assignment is a solid strategy for early onboarding and one-off requirements. However, as we expand our consumption of Delphix, I suggest leveraging the Tagging mechanism to assign permissions quickly. Similar to the Account & Access Group’s “login_groups” tag, we can assign tags to Objects and Roles to immediately grant or restrict access. This is the recommended approach for a robust production implementation.
Before jumping back into a Role, navigate to the top-level Data >VDBs tab. (If you don’t have any VDBs, select another tab with available objects.) Here identify a test object and select the “Add Tags” button.
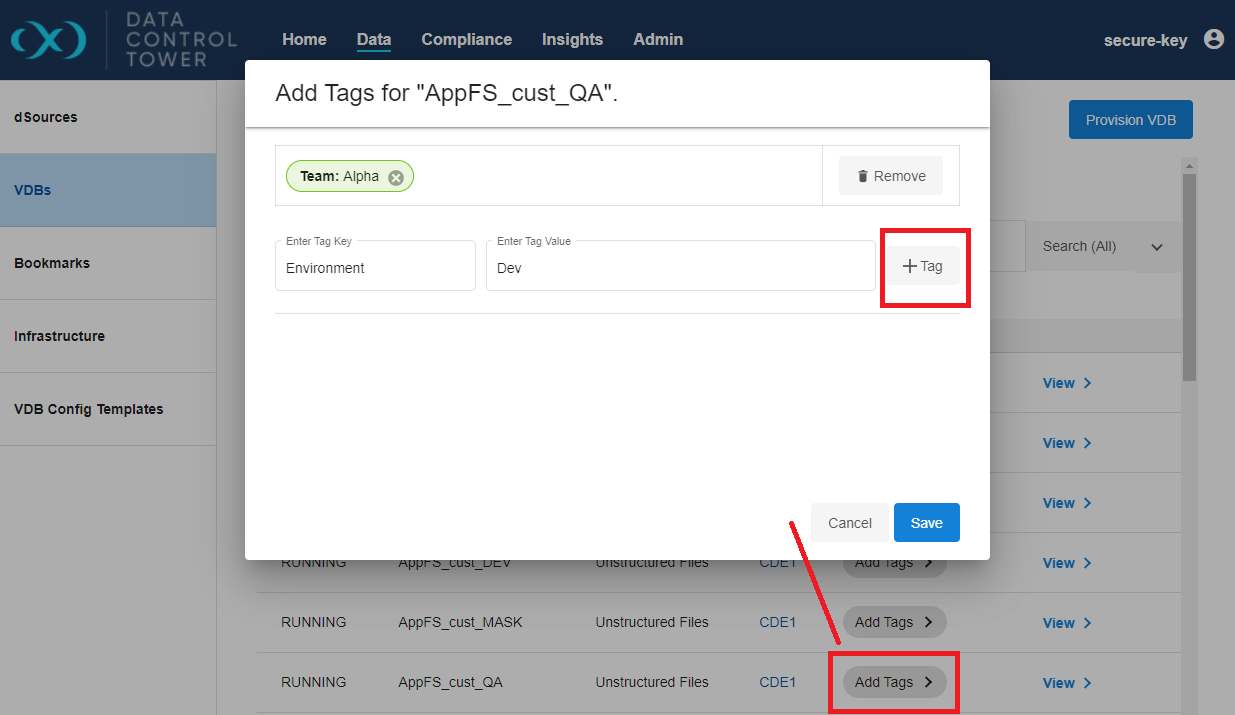
In this form, we assign a simple Key-Value pair. This pair helps govern access and maintain the organization of the Delphix Platform. I’ve selected the “Team: Alpha” and “Environment-Dev” pairs in my example. Repeat the process for a couple of other objects using similar or different Key-Value pairs. As I explained earlier in this post, we can define and create an organizational structure in many ways. If you prefer other pairings, please experiment, such as with Geography, Age, DB Type, or Importance.
Next, let’s take advantage of the created tags in the Access Model. Navigate back to your test Access Group, select the Roles tab, and edit the Role we modified previously. Because “Scoped” is already chosen, press the “Next” button, but this time stop on the “Add Tag Mappings” view. Similar to your Object’s tag assignment, specify one or two of the same Key-Value pairs here.
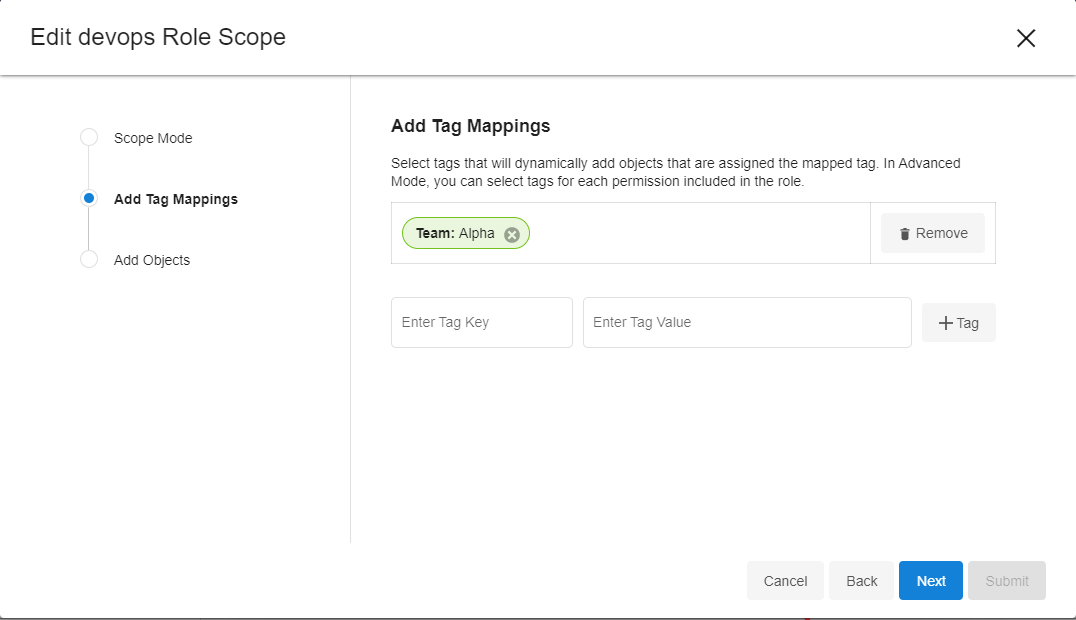
In my example, this process will assign the Objects with the chosen “Team: Alpha” tag to this “devops” Role. Thus, granting the set of permissions defined by “devops”. Finally, we can verify again by completing the form and previewing the Role.
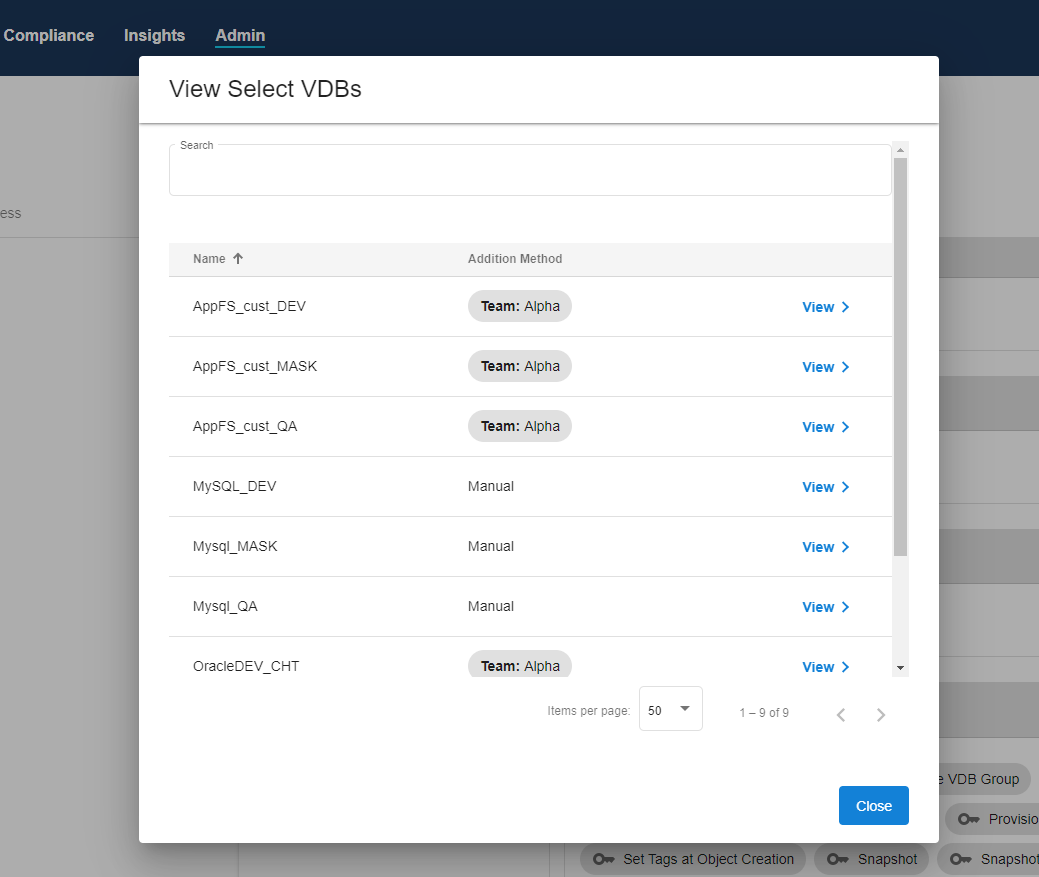
In my example, we can see a mix of objects assigned to this role through Tags and Manual (direct) assignments.
At this point, challenge yourself by adding and removing tags to different Roles and Objects to understand the flexibility of the ABAC model. If you need a deeper dive into Tags, read our documentation here.